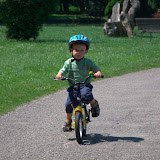
Hartes Training mit dem Laufrad führte nun zu einem etwas früher als geplanten Tag “X”. Die Stützen dürfen den Drahtesel verlassen und auf ewig in den Tiefen eines häuslichen Kellers abtauchen. Obgleich die Anspannung die Freude auf den ersten Metern noch etwas überwogen hat, war es ein einzigartiges Ereignis. Raufsetzen, halten, treten… und .. es fährt… es fährt!…
Bremsen hat gottseidank auch funktioniert und somit hat der Tag in Laxenburg auf dem Rad auch keine Blessuren gebracht, sondern nur viel Selbstvertrauen. (Ja wir hoffen auch, dass die schulische Karriere mit der gleichen Ambition umgesetzt wird)
After a while I had the chance to get back to MooseX::Log::Log4perl, which is Role (based on Moose) that can be easily reused in classes requiring logging functionality.
While it is really simple to use, I still found myself often directly using the default logger approach by creating a class variable and using that. So instead of:
use Moose;
with MooseX::Log::Log4perl;
sub whatever {
    my $self = shift;
    $self->log->debug("Here I am") if $self->log->is_debug;
}
mostly the direct logger was used in the classes.
use Log::Log4perl;
use vars qw($log);
$log = Log::Log4perl->get_logger(__PACKAGE__);
sub whatever {
    my $self = shift;
    $log->debug("Here I am") if $log->is_debug;
}
One reason was that during that time I optimized for speed and found a hotspot to be the additional method call for the “log” method. As perl has some overhead in calling functions, this still holds true to some extend, so that’s why I added a benchmarking test to the testsuite of MooseX::Log::Log4perl.
So if you have the chance, I’d like to see if in your test environment still the performance limits (keep overhead lower than 5% compared to using Log::Log4perl directly). To run the test simply get the sources and run the test.
cpan> look MooseX::Log::Log4perl
shell# TEST_MAINT=1 prove -l -v t/99_bench.t
t/99bench.t ..
1..6
ok 1 - Bench instance for MooseX::Log::Log4perl isa BenchMooseXLogLog4perl
ok 2 - Bench instance for Log::Log4perl isa BenchLogLog4perl
                     Rate MooseX-L4p log MooseX-L4p logger Log4perl method Log4perl direct
MooseX-L4p log    21235/s             --               -0%             -4%             -6%
MooseX-L4p logger 21273/s             0%                --             -4%             -6%
Log4perl method   22102/s             4%                4%              --             -2%
Log4perl direct   22535/s             6%                6%              2%              --
...
If all tests pass you stayed within the limits (around 95% compared to using Log4perl directly). I’d like to see your results. So please comment on it and add the comparison table to it.
The system itself is a Dell D830 laptop with a nvidia NV135 chip and an Intel Core2 Duo T7500 CPU with 2GB RAM. For actual benchmarking the new futuremark paecekeeper browser benchmark has been put to use.
The compared browsers are:
Midori 0.1.4 (lightweight GTK browser using webkit)
Iceweasel 3.0.9 (the debian rebranded Firefox 3.0.9)
The results are quite unexpected, as working with the browser show a different perceived quality. Although midori scores highest in the peacekeeper benchmark, the rendering on some sites is sometimes flaky and seem to take longer as with both firefox version. On the other hand the sunspider benchmark shows midori far behind firefox, which also is strange as SunSpider is from the webkit project and should therefor be quite fast on a browser using webkit.
Hartes Training mit dem Laufrad führte nun zu einem etwas früher als geplanten Tag “X”. Die Stützen dürfen den Drahtesel verlassen und auf ewig in den Tiefen eines häuslichen Kellers abtauchen. Obgleich die Anspannung die Freude auf den ersten Metern noch etwas überwogen hat, war es ein einzigartiges Ereignis. Raufsetzen, halten, treten… und .. es fährt… es fährt!…
Bremsen hat gottseidank auch funktioniert und somit hat der Tag in Laxenburg auf dem Rad auch keine Blessuren gebracht, sondern nur viel Selbstvertrauen. (Ja wir hoffen auch, dass die schulische Karriere mit der gleichen Ambition umgesetzt wird)
In the process of getting a debian repostiry ready to allow easy installtion with debian’s apt, a small series of posts are going to be created here. So here is the initial post describing a very simple debian repository layout.
All that’s required to setup your own debian repository is the dpkg-dev package and a web or ftp server for serving the files. For a local deployement (e.g. within a company) also a file-system based approch is possible through a NFS mounted directory.
Make sure the dpkg-dev package is installed:
sh# aptitude install dpkg-dev
Copy all files into a directory binary on the server. So the layout will look something like this:
(webserver-root)
+-- debian
+-- binary
|Â Â Â +-- myweb-2.0-1_i386.deb
|Â Â Â +-- myweb-utils-2.0-1_i386.deb
+-- source
Here the packages in the binary directory can new be used to create the repository index and serve this then as a debian repository. To scan the packages and create the index use:
After seeing that ATI has released again drivers for Linux with a new major version number (and not the scarry .0 behind it) I thought it was time to battle the ATI dragons again. As Debian usually lags behind on the proprietary ATI stuff (who wonders…) I’m using aain the binary packages provided by ATI.
The system is Debian testing, which is now codenamed “Squeeze” as Lenny finally stablized.
As the build required libstdc++5 I had to reinstall this package:
sh# aptitude install libstdc++5
Downloaded the latest ati-driver-installer-9.2-x86.x86_64.run and ran the usual:
sh# sudo sh ati-driver-installer-9.2-x86.x86_64.run --buildpkg Debian/testing
which results in the following packages being built:
fglrx-amdcccle_8.582-1_amd64.deb
fglrx-driver_8.582-1_amd64.deb
fglrx-driver-dev_8.582-1_amd64.deb
fglrx-kernel-src_8.582-1_amd64.deb
Install those and if RandR 1.2 is compiled into Xorg (which it is usually) your dual-screen setup probably switches back to a cloned view. In case you never had a working dual-screen (called big desktop by ATI) setup, run the following (and be sure to backup your /etc/X11/xorg.conf in case you have anything special in there), otherwise skip this section:
sh# sudo dpkg-reconfigure -phigh xserver-xorg

sh# aticonfig --initial --desktop-setup=horizontal --overlay-on=1
Then be sure to have added a “Virtual” desktop size to your “Display” subsection like so (for two 1680×1050 screens thats 3360×1050):
 Hartes Training mit dem Laufrad führte nun zu einem etwas früher als geplanten Tag “X”. Die Stützen dürfen den Drahtesel verlassen und auf ewig in den Tiefen eines häuslichen Kellers abtauchen. Obgleich die Anspannung die Freude auf den ersten Metern noch etwas überwogen hat, war es ein einzigartiges Ereignis. Raufsetzen, halten, treten… und .. es fährt… es fährt!…

